Ben and I recently decided to take on the popular task of painting a world map in our community. We started thinking about this early on in our service, based on the popularity of the world map we have hanging in our house. Community members often pop by to say hi, stare at all of the stuff we have, and to look at the world map and ask questions about places they've heard about. "Where is Haiti?" "Where is Panama?" "Wow, we're TINY!" At this point, we could continue on to a probably much more interesting blog topic "What it feels like to live in a zoo exhibit..." but we're not.
The map's popularity sparked an idea - lets paint one at the school! We'd be helping community members to learn about the world, and geography, and it's a physical piece of work that we can leave in the community (working in business concepts doesn't always give us that "we've accomplished a lot" feeling). We approached the director of the school at the end of the last school year (December) about painting over the summer and finishing the map before the next year started (early March). In early February Ben and I received a small amount of funding from a Peace Corps Panama volunteer organization, and we got to work.
The World Map project actually is something pretty well organized (developed by a Peace Corps volunteer) and popular. We used a book to help us with each step of the process. Step one - pick a place and get it ready! The school director decided that the best spot would be the new school library. For the record, the library is only full of textbooks and a couple of really outdated Encyclopedias -in ENGLISH. Ben and I went to work deciding how big the map would be (6 feet by 12 feet), measuring it out on the wall and scrubbing the wall. Even though the library was only built a year ago, the wall was covered in dirty hand and foot prints and other various interesting items.

Step two - paint the whole rectangle in "ocean blue." Step three - From there we drew grid lines covering the whole area - each grid was 2.5 inches square, which meant a total of over 1,500 grid squares. Why a grid? - so we could use much smaller photocopied grids from the book to basically free-hand draw the world onto the wall. Why paint it blue first? So we wouldn't have to paint all those coasts twice (with the color of the country and then the blue - what a GREAT idea!) In hindsight, we drew our gridlines too dark. We realized this when we had to erase all those lines and ripped a lot of flesh off of our fingers in doing so.


Step four - Draw! This wasn't so bad, and went a bit faster than we expected it too, but we drew everything very detailed - which just meant that painting would be even more detailed. Which leads to the obvious next step, five, Painting! We bought 4 colors of paint, red, blue, yellow and white and mixed other colors from those. Painting went much slower than drawing, and Ben ended up doing most of the super detailed countries (the colors red, purple, and part of yellow) and I painted the light green, green, blue, pink, orange, and most of yellow.


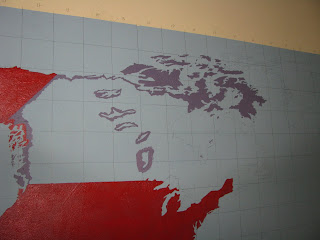

Step six - we drew a few extra items - the Panamanian flag, the Peace Corps logo, and a compass rose, and painted them as well. Step seven - erasing the gridlines - BOO! This took over 30 rectangular erasers (we're not talking the small erasers on the ends of pencils), and much of the flesh off our hands. Step eight - sealing the map. We hit a speed bump here. When we bought our sealant we conveniently did NOT notice that it said it was white, in ENGLISH on the can. OY. So, we were working on the map two days before the school year started when we discovered this. The next day, I made an insanely fast trip to David (leaving site at 5am, and getting off the chiva back in site at 3pm) so I could exchange the sealant for a transparent one, and get back to get a coat on in the afternoon. The next day, step nine - labeling! After one coat of sealant, we labeled the countries and oceans with black permanent marker, added our beautiful signatures, and then slapped on two more coats of sealant and called it done on the first day of school as the kids watched.


All in all, it took 2 weeks of time - we're not talking 2 work weeks in the states! 14 whole days, 8+ hours a day. It was a lot, but it's great! And more important that this physical reminder of our service, we're already educating people with it. All throughout the process of painting, children and adults would pop in to watch us work, and it was amazing how often we were asked what we were painting - they had no recognition of it being a world map (even when it was done). We were also often asked if it was just a map of Panama. Nope, the WHOLE world! The kids have already really enjoyed reading off all the names of the countries (in Spanish, of course) and the teachers are already using it in some of their lessons.

When things slow down a little for us, we also hope to teach a few lessons here and there at the school on geography and world events. In the meantime, at least most people in the community can now identify that 1. it's the world, 2. where Panama is, and 3. they can say that Panama is pretty important to the world despite it's size!


3 comments:
Wow! That is a beautiful map! Good job. Two weeks! I certainly didn't get that feeling from the pictures. Good thing you mentioned it in the text.
WOW ! AWESOME !! I love it and the step-by-step process you described in your posting. That's a really nice addition to the school and it will continue to teach for many years to come. Thanks for sharing it with us gringos !
Love you & miss you !! :-) Mom, Dad, Lady, Nikodemus, Daisy, Amigo, Nikki and Gordo
Wow, great job! Love it!
Post a Comment